Playing with building blocks
Introduction
This section illustrate how you can use JavaScript on the server-side to chain services together to build new ones. You will create a ZOO Services Provider using the services you seen before and the WFS server using the ZOO-API. The final goal is to query all POIs included in a buffer around a feature and to highlight them using a mask around this buffer. The following screenshot show you the expected result:
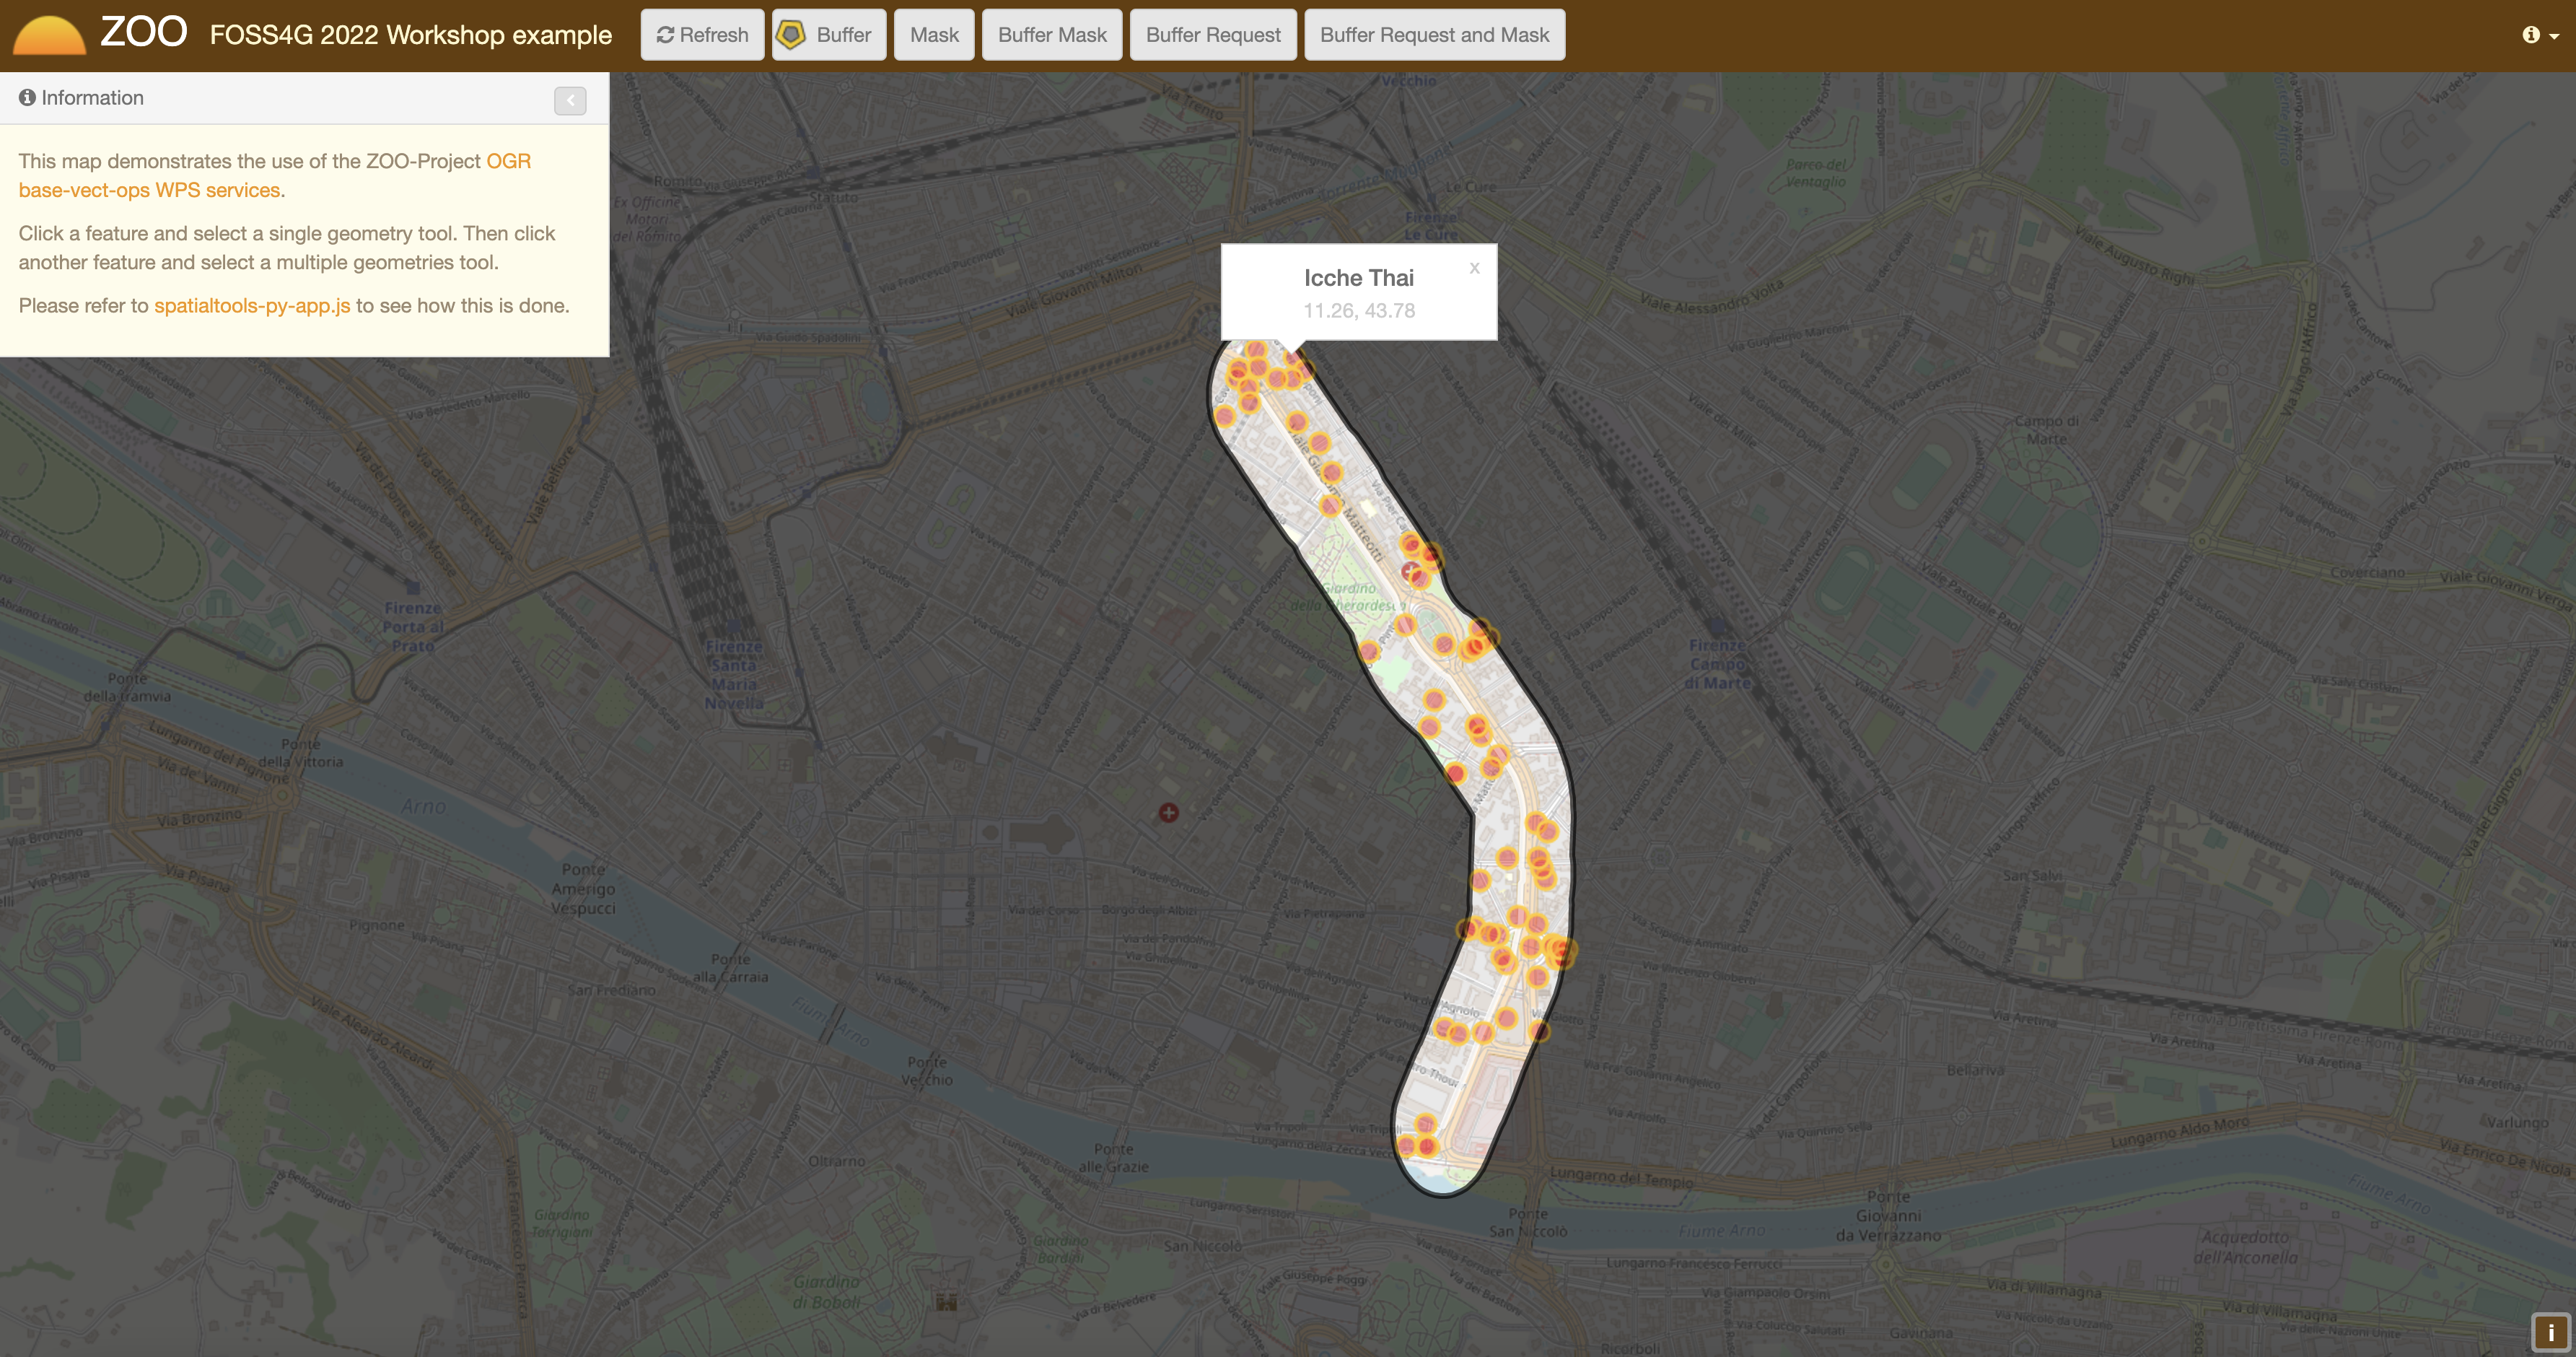
You can decompose the result above in two different ones: the mask around the
buffer and the points included in the buffer. So you will create two different
Services: one called BufferMask and another one called BufferRequest.
But before implementing any JavaScript Service, you will get an overview of how to use ZOO-API from your ZOO-Project installation in the next section.
As before, you first create a new directory to store files for your new Services Provider:
mkdir myChain/
ZOO-API Overview
ZOO-API and ZOO-Kernel JavaScript support make you able to run services implemented in JavaScript on the server side. JavaScript is a popular programing language but mostly used on the client side. Let say from a browser, but here it is a bit different.
To support JavaScript language ZOO-Kernel use the
SpiderMonkey API
to create a javascript runtime environment from which it will load
your JS file then extract the function corresponding to the service to
run it using the prefilled parameters. The JavaScript runtime
environment created by the ZOO-Kernel depend on your setup. If you
placed the ZOO-api.js and ZOO-proj4js.js in the same directory
as your ZOO-Kernel it means that your environment will contains
ZOO-API and Proj4js which will be loaded before your service. In such
case you can access to the Classes defined in the JavaScript ZOO-API
to manipulate geographic data, for more informations please refer to
the ZOO-API Documentation.
Even if it can be useful to run JavaScript on the server side, you should
remember that some basic JavaScript functions you are familiar with does not
exist or get a different behavior. For instance the simple alert
function will display messages in apache error logs rather than in a window when
used from a browser. The alert function can be used as follow:
alert("My alert message");
There is no XMLHttpRequest available in the JavaScript evironement your service
will run into. Hopefully, the ZOO-Kernel expose a C function to the JavaScript
world named: JSRequest. This function make you able from your JavaScript
services to call other WPS services (locally or remotelly) or other kind OGC
services such as WFS. When you are using the ZOO-API it is possible to call
Services using a ZOO.Process instance [1], to parse WPS Responses using
ZOO.Format.WPS
(cf. ref).
As for Python services you already seen in previous sections, the functions
corresponding to a Service should take three arguments: conf,
inputs and outputs [2]. Nevertheless, as the ZOO-Kernel is
not able to access the values modified [3] by the Service code,
rather than returning an integer as in Python, here you’ll need to
return both the integer value and the resulting outputs values as
an Object [4]. You can see in the following an example of a
JavaScript Service code:
function SampleService(conf,inputs,outputs){
  outputs["Result"]["value"]=someComputation(inputs);
  return
    {
        result: ZOO.SERVICE_SUCCEEDED,
        outputs: outputs
    };
}
Before starting to implement the Services we will need to get our final BufferRequest service, let start with a simplier one.
The Mask Service
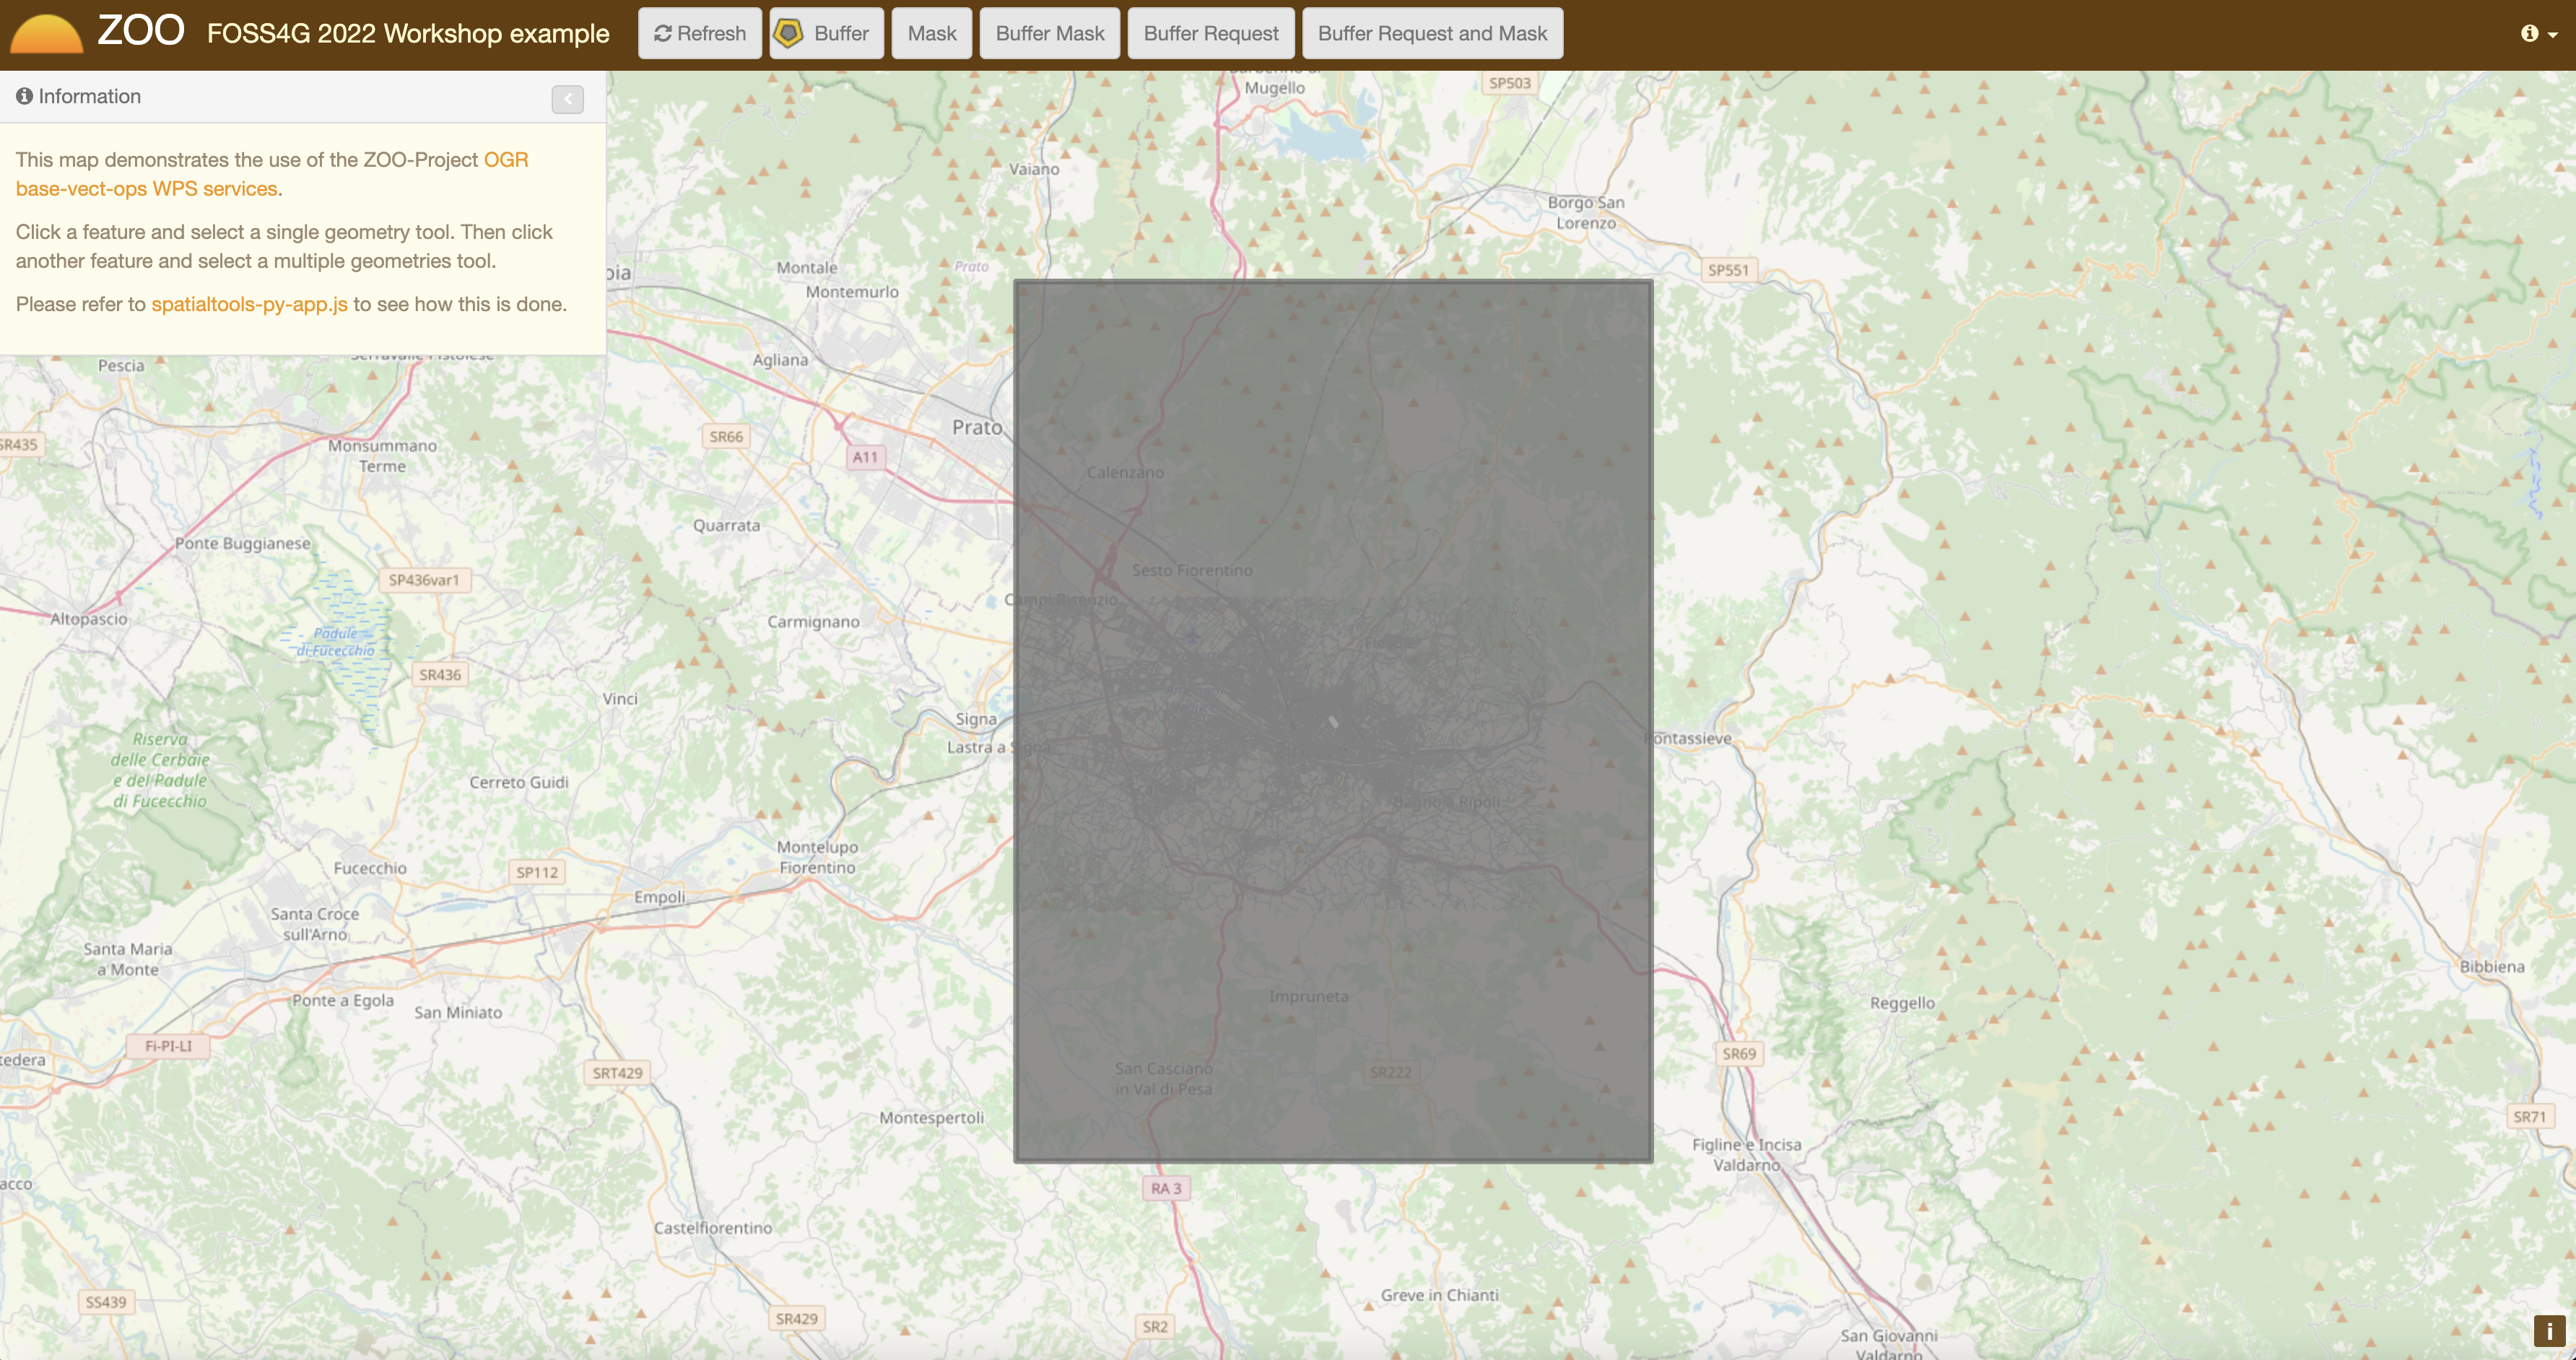
In this section you will learn how to create your first JavaScript service which will simply return a rectangular mask around a selected feature. To build this mask you will use the Buffer service to create a buffer big enough around a selected geometry to cover a significant part of your map. You can see the expected result in the following screenshot:
As before, you will first start by writting the ZCFG, then you will write the JavaScript source code and finish by publishing your Services Provider.
The ZCFG
Open a file named
myChain/Mask.zcfg
with your favorite text editor and add the following content:
[Mask]
 Title = Compute mask
 Abstract = Compute mask around a geometry
 processVersion = 1
 storeSupported = true
 statusSupported = true
 serviceProvider = foss4gws.js
 serviceType = JS
 <DataInputs>
  [InputData]
   Title = The feature
   Abstract = The feature to run the service with
   minOccurs = 1
   maxOccurs = 1
   <ComplexData>
    <Default>
    mimeType = text/xml
    encoding = utf-8
    </Default>
   </ComplexData>
 </DataInputs>
 <DataOutputs>
  [Result]
   Title = The resulting feature
   Abstract = The feature created by the service.
   <ComplexOutput>
     <Default>
     mimeType = application/json
     </Default>
   </ComplexOutput>
 </DataOutputs>
Here you simply define one default ComplexData for both inputData and
Result: a GML and a GeoJSON respectively [5].
The JavaScript service
As you will have to request the Buffer service many times from your service, you
will first define Buffer and BufferToBBOX functions as
follow. It uses the ZOO.Process to request the Buffer service you
seen in the previous section.
Open a file named
myChain/foss4gws.js and
add the following content:
var zoo_url='http://localhost/cgi-bin/zoo_loader.cgi';
var mapfile="/var/data/maps/project_WS2022.map";

function Buffer(inputData,bDist){

  // Create all required ZOO.formats
  var fGJ=new ZOO.Format.GeoJSON();

  // Call the Buffer service
  var myInputs = {InputPolygon: { type: 'complex', value: fGJ.write(inputData),mimeType: "application/json"}, BufferDistance: {type: 'float', "value": bDist } };
  var myOutputs= {Result: { type: 'RawDataOutput', "mimeType": "application/json" }};
  var myProcess = new ZOO.Process(zoo_url,'Buffer');
  var myExecuteResult=myProcess.Execute(myInputs,myOutputs);
  return fGJ.read(myExecuteResult);

}

function BufferToBBOX(inputs,dist){
  // Create all required ZOO.formats
  var fGJ=new ZOO.Format.GeoJSON();
  var fGML=new ZOO.Format.GML();
  if(inputs["InputData"]["mimeType"]=="application/json")
      fGML=new ZOO.Format.GeoJSON();

  // Read the   input GML
  var inputData=fGML.read(inputs["InputData"]["value"]);
  alert(inputData);

  // Compute Buffer
  var bufferResultAsJSON=Buffer(inputData,dist);
  alert(bufferResultAsJSON);

  // Create the Buffer result BBOX
  var bbox = new ZOO.Bounds();
  var bounds=bufferResultAsJSON[0].geometry.getVertices();
  for(var t in bounds){
    bbox.extend(bounds[t]);
  }
  return [bbox,bufferResultAsJSON,inputData];
}
From line 9, you give a GeoJSON string (created from inputData) for
InputPolygon and, on line 11, you call the Buffer
service. Then, you return the result of the execution of the Buffer service.
On line 11 you create a ZOO.Process instance providing the ZOO-Kernel url and the Service name. Then, on line 12, you run the request passing inputs and outputs previously defined (from line 9 to 10).
Now, you get your Buffer function, it is time to create your first
JavaScript service. So, edit your foss4gws.js file you created
before and add the following content:
function Mask(conf,inputs,outputs){
  var fGJ=new ZOO.Format.GeoJSON();
  var bbox = BufferToBBOX(inputs,0.15);
  var finalG=bbox[0].toGeometry();
  var result=new ZOO.Feature(finalG,{"name": "Result1000"});
  outputs["Result"]["value"]=fGJ.write(result);
  return {result: ZOO.SERVICE_SUCCEEDED, outputs: outputs };
}
Publish and use your Service
Now you get both your ZCFG and your service code ready, you need to deploy your new Services Provider using the following command:
for i in $(ls myChain);
do
    docker cp myChain/$i \
            zoo-project_zookernel_1:/usr/lib/cgi-bin/$i ;
done
Now you are ready to use your JavaScript service by loading the following url, click on a street then click on the “Mask” button.
BufferMask Service
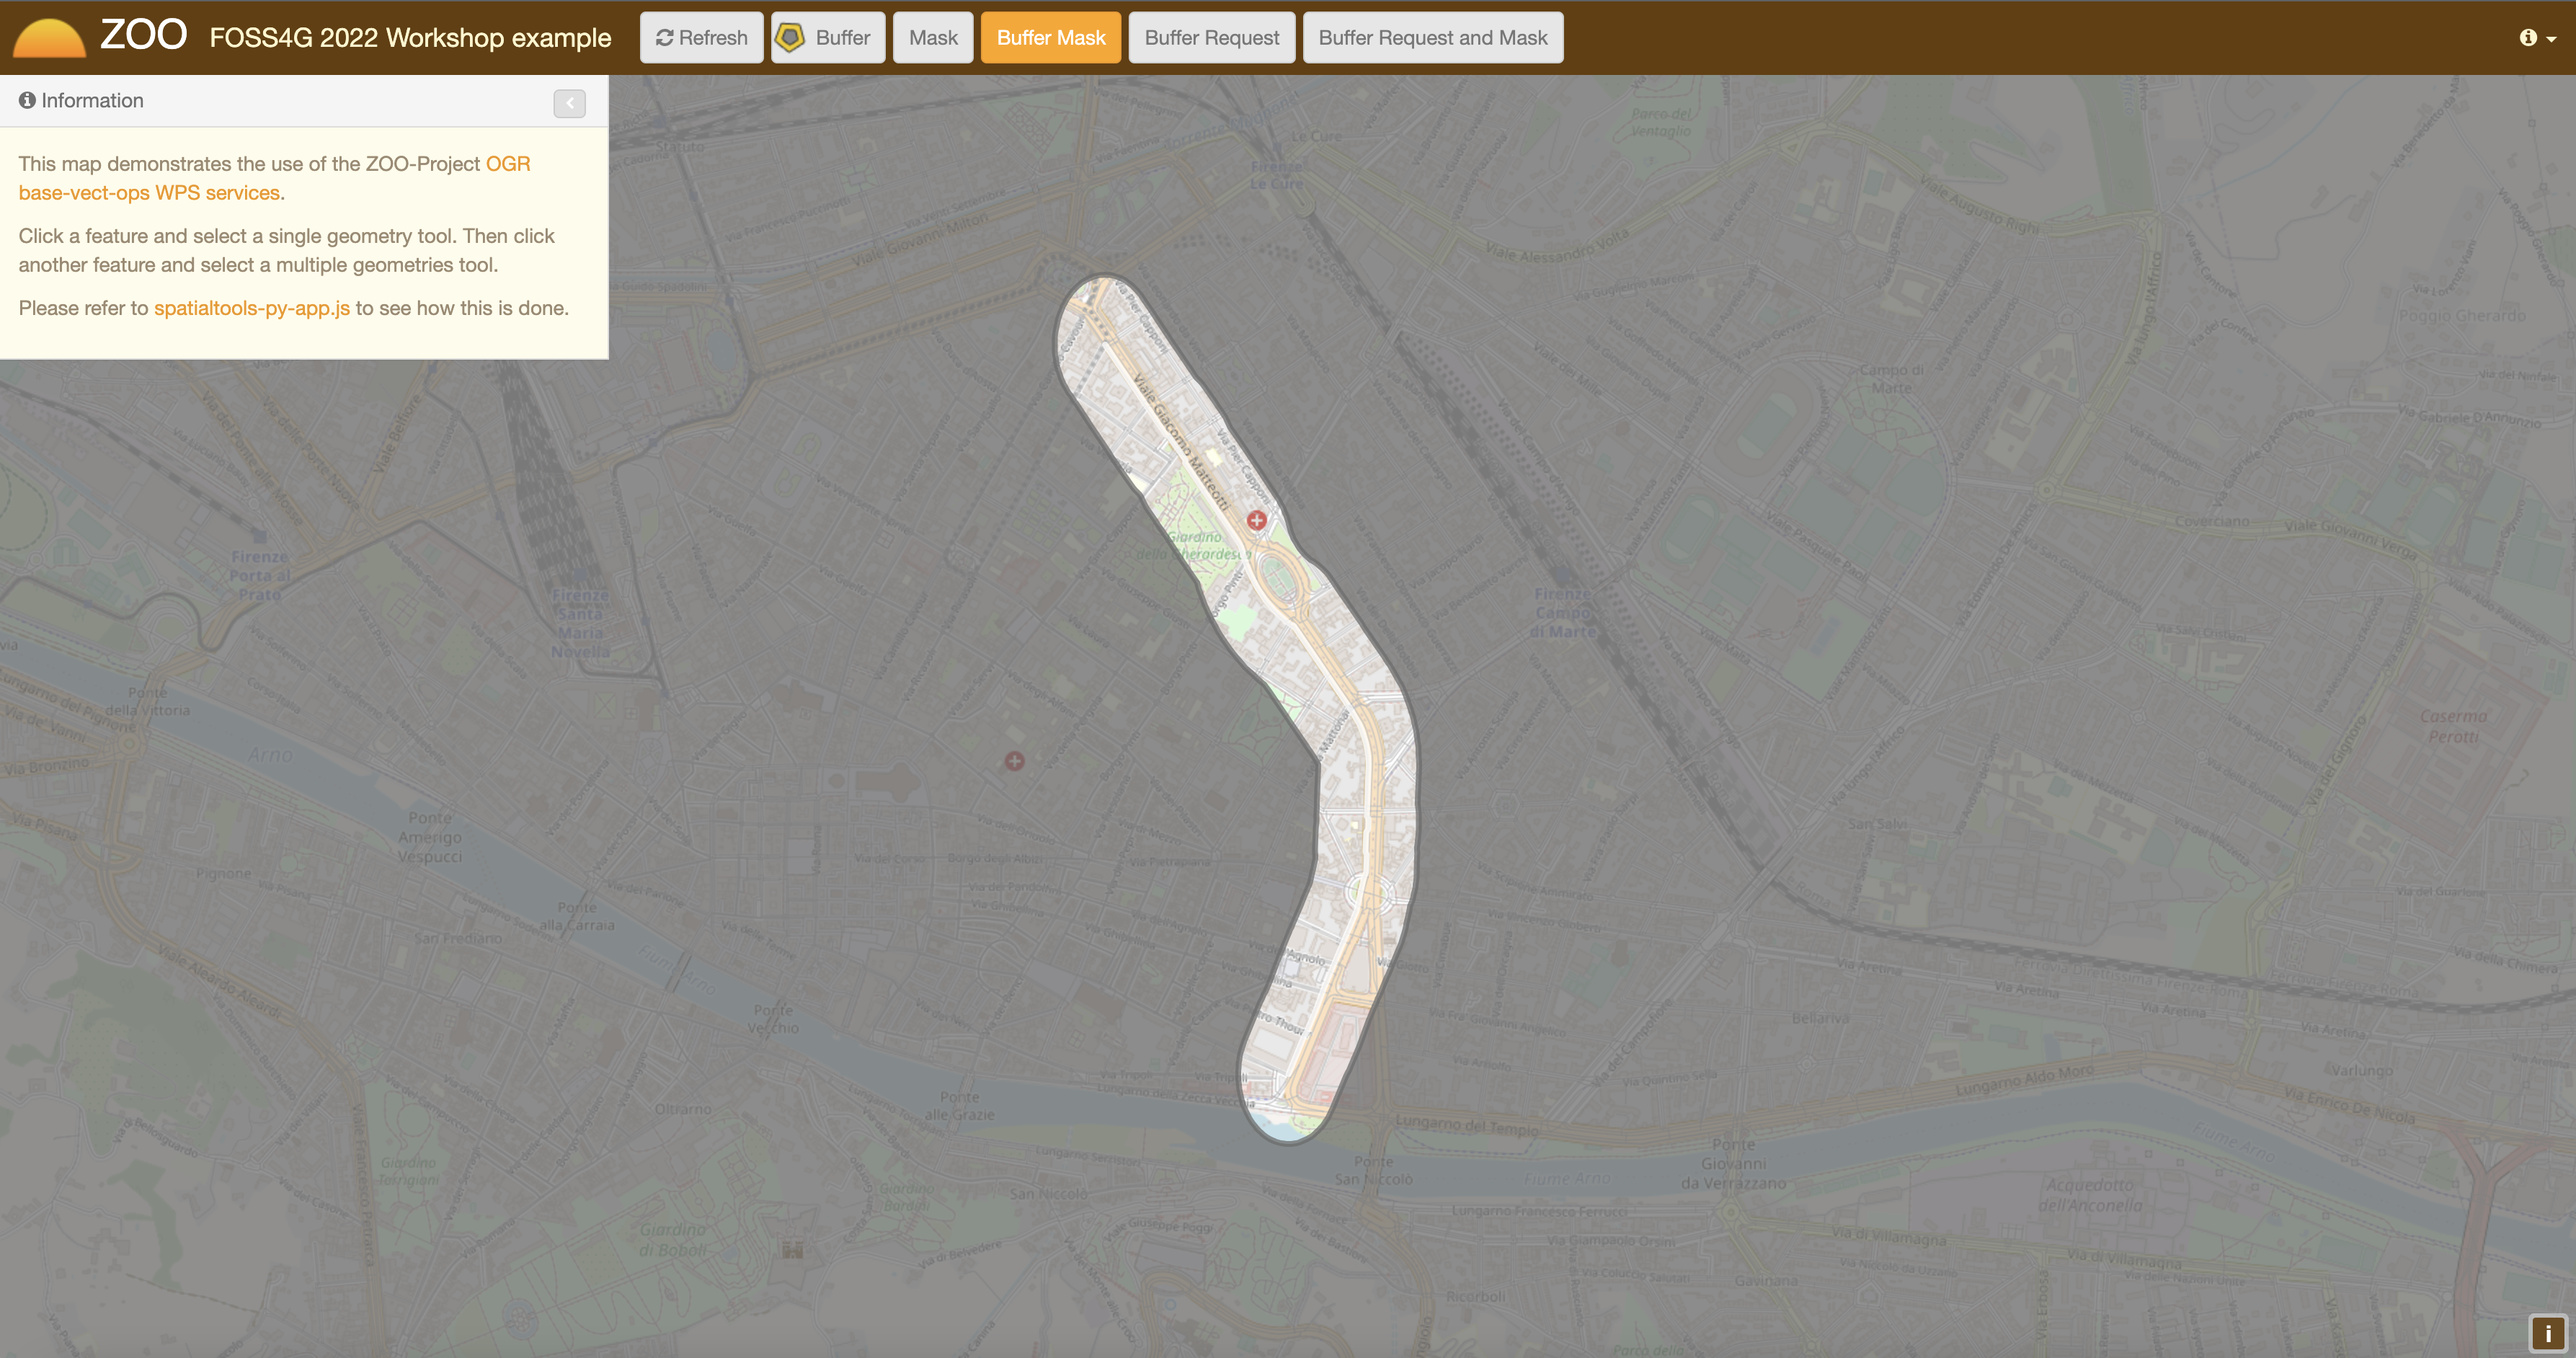
In this section you will implement a simple JavaScript service which will be able create a hole in the mask you created in previous section. This service will be used to highlight the buffer zone around a selected fature. You get a preview of the expected result in the following screenshot:
The ZCFG
Open the file named
~/zoo-ws/jschains/cgi-env/BufferMask.zcfg
with your favorite text editor and copy / paste the following content:
[BufferMask]
 Title = Compute buffer mask
 Abstract = Compute buffer mask around a geometry
 processVersion = 1
 storeSupported = true
 statusSupported = true
 serviceProvider = foss4gws.js
 serviceType = JS
 <DataInputs>
  [InputData]
   Title = The feature
   Abstract = The feature to run the service with
   minOccurs = 1
   maxOccurs = 1
   <ComplexData>
    <Default>
    mimeType = text/xml
    encoding = utf-8
    </Default>
   </ComplexData>
 </DataInputs>
 <DataOutputs>
  [Result]
   Title = The resulting feature
   Abstract = The feature created by the service.
   <ComplexOutput>
     <Default>
     mimeType = application/json
     </Default>
   </ComplexOutput>
 </DataOutputs>
This ZCFG is similar to the previous one. Please, refer to comments in the previous section for more informations.
The JavaScript service
In this Service you will use same source code (until line 19) you used in the previous section. Indeed, you should compute the Mask as you did before then compute Buffer for creating a hole in the mask (on line 22) to run the Difference service (from line 25 to 40).
function BufferMask(conf,inputs,outputs){

  // Compute big Buffer
  var bbox = BufferToBBOX(inputs,0.15);
  var finalG=bbox[0].toGeometry();
  var fGJ=new ZOO.Format.GeoJSON();

  // Compute Buffer standard buffer
  var bufferResultAsJSON=Buffer(bbox[2],0.0015);

  // Request Difference service using Buffer result and features in the BBOX
  var result=new ZOO.Feature(finalG,{"fid": "1","name": "Result1000"});
  var myProcess2 = new ZOO.Process(zoo_url,'Difference');
  var myInputs2 = {
    InputEntity1: { type: 'complex',  value: fGJ.write(finalG), mimeType: "application/json" },
    InputEntity2: { type: 'complex',  value: fGJ.write(bufferResultAsJSON), mimeType: "application/json"}
  };
  var myOutputs2= {Result: { type: 'RawDataOutput', "mimeType": "application/json" } };
  var myExecuteResult4=myProcess2.Execute(myInputs2,myOutputs2);

  outputs["Result"]["value"]=myExecuteResult4;
  return {result: ZOO.SERVICE_SUCCEEDED, outputs: outputs };

}
Publish and use your Service
Now, you can publish your service as you did before. To use your service, please use the following url.
BufferRequest service
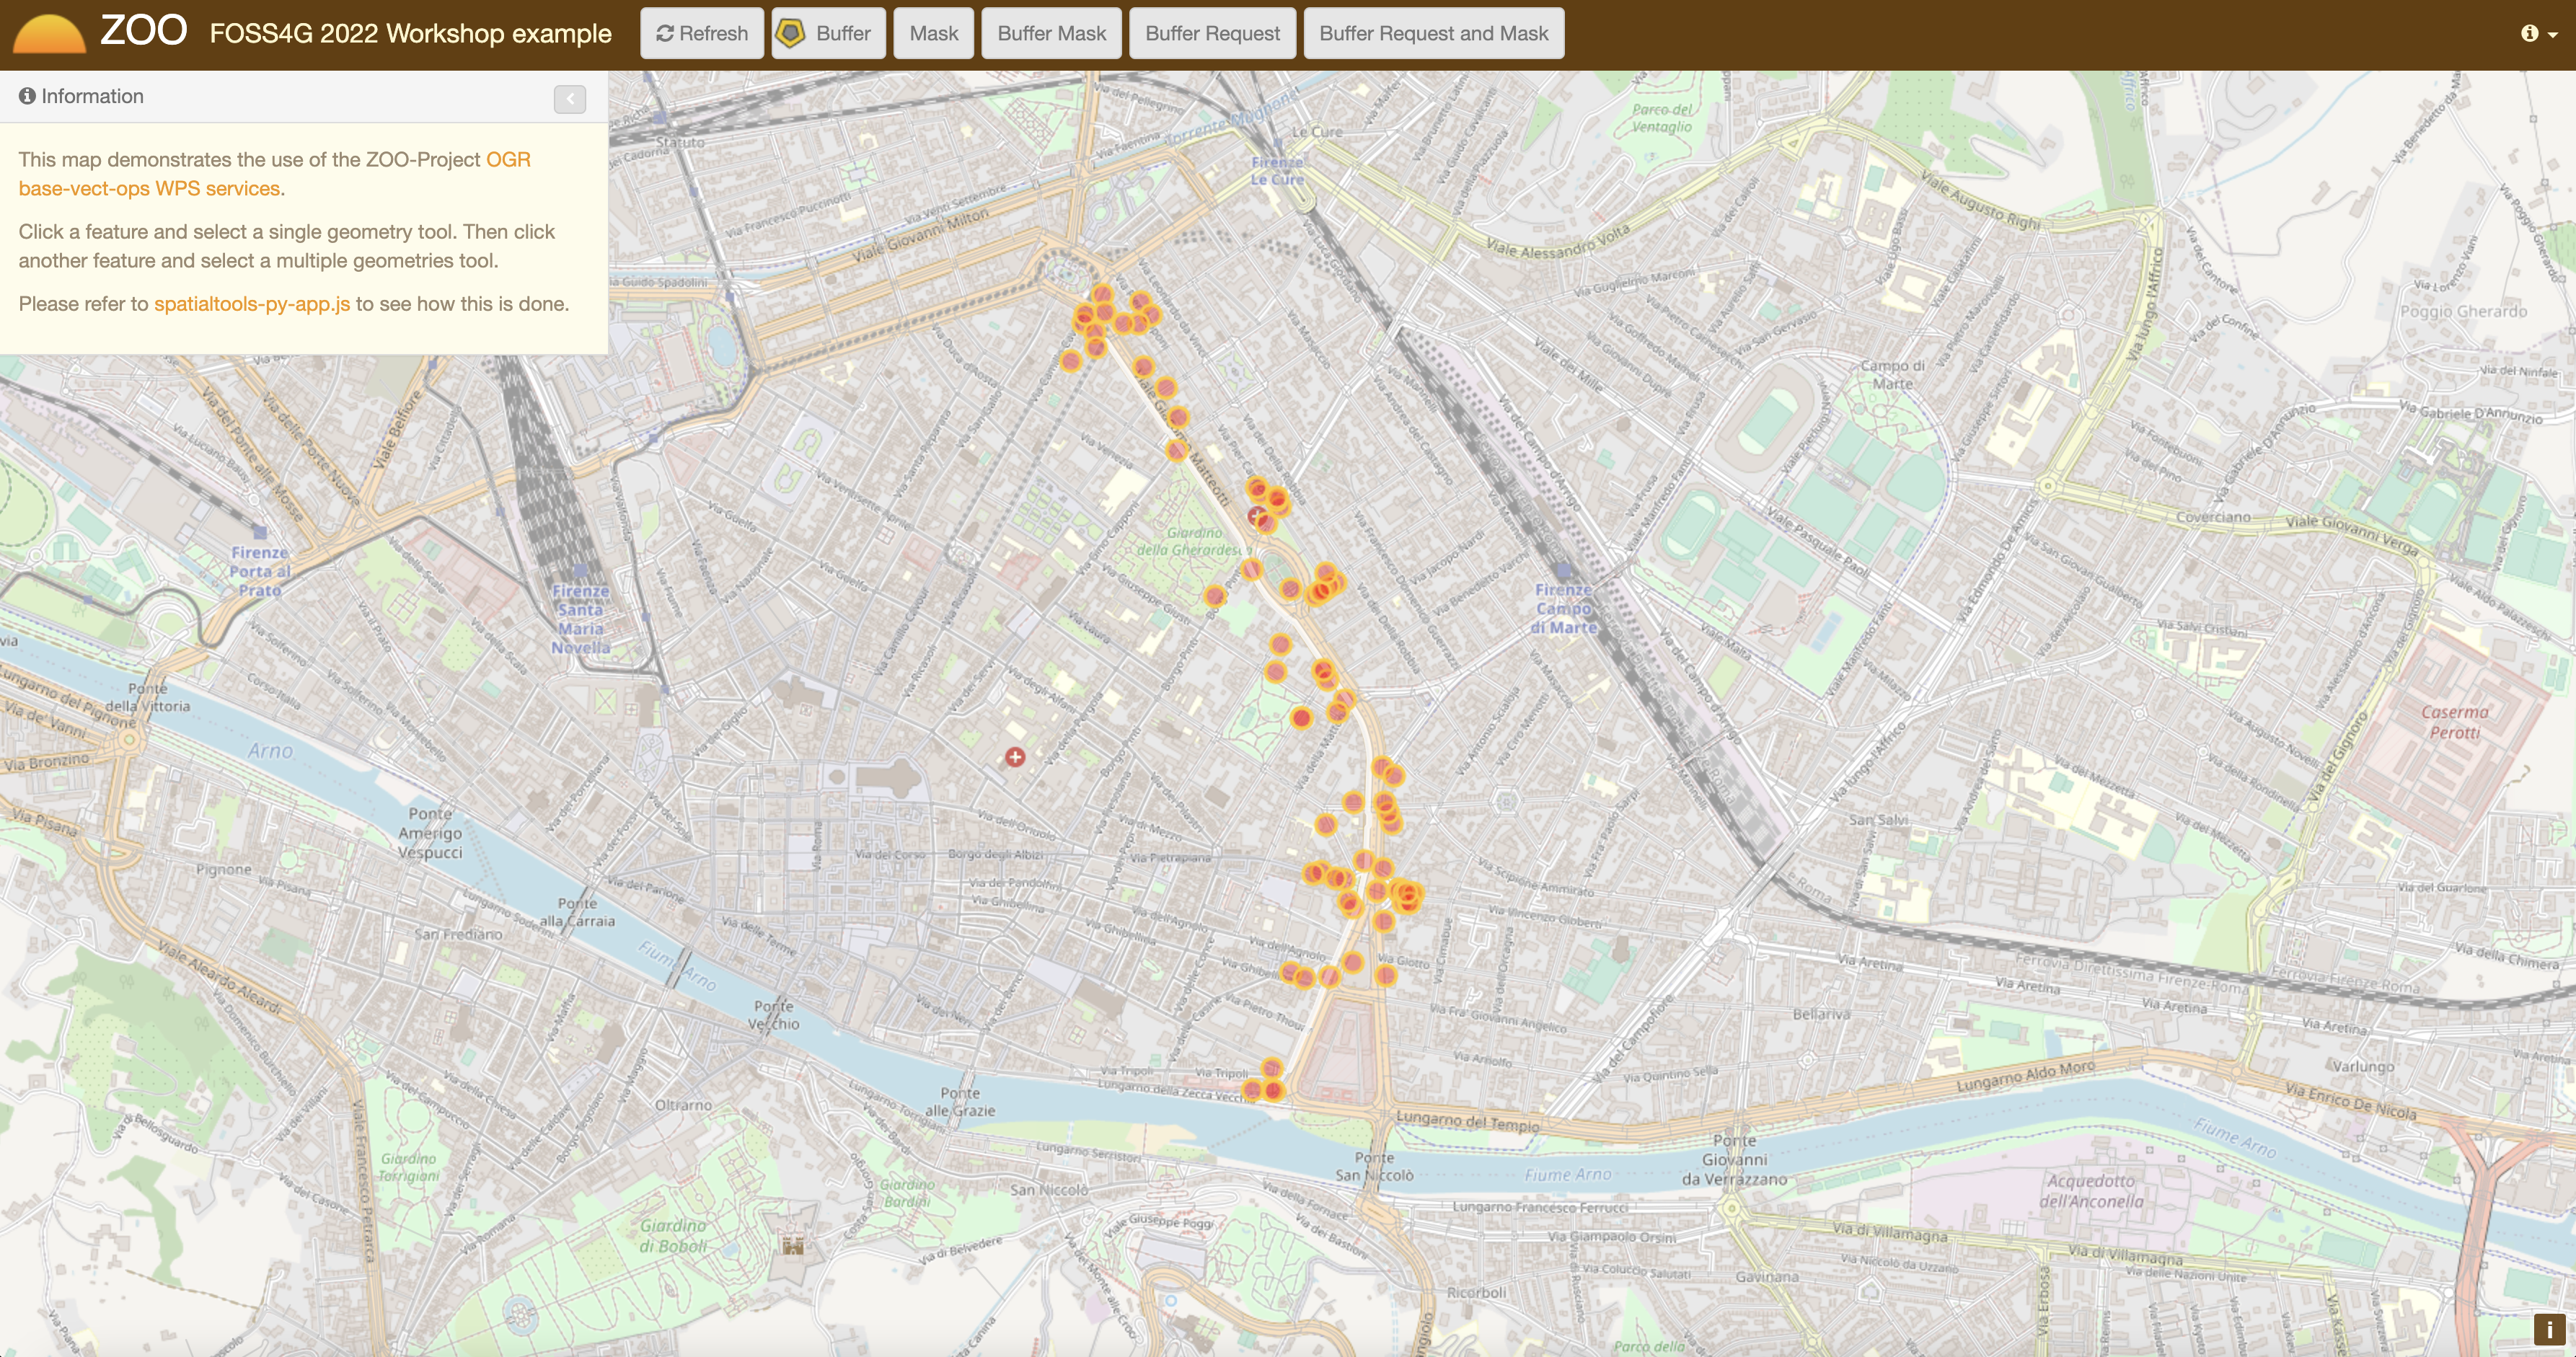
In this section, you will create a new Service: BufferRequest which will request
POIs included in the Buffer around a selected feature [6]. You will use the poi
layer served as WFS through your local mapserver installation. You can see in the
following screenshot the expected result:
The ZCFG
Open the file named
~/zoo-ws/jschains/cgi-env/BufferRequest.zcfg
with your favorite text editor and copy / paste the following content:
[BufferRequest]
 Title = Compute buffer request
 Abstract = Compute buffer request around a geometry
 processVersion = 1
 storeSupported = true
 statusSupported = true
 serviceProvider = foss4gws.js
 serviceType = JS
 <DataInputs>
  [InputData]
   Title = The feature
   Abstract = The feature to run the service with
   minOccurs = 1
   maxOccurs = 1
   <ComplexData>
    <Default>
    mimeType = text/xml
    encoding = utf-8
    </Default>
   </ComplexData>
 </DataInputs>
 <DataOutputs>
  [Result]
   Title = The resulting feature
   Abstract = The feature created by the service.
   <ComplexOutput>
     <Default>
     mimeType = application/json
     </Default>
   </ComplexOutput>
 </DataOutputs>
The JavaScript code
As in the previous Service, you will compute a buffer around the input feature. But then
you will request POIs available in the Buffer extent using a WFS request to use them to
run Intersection service using the initial Buffer. The WFS request is useful to limit
the number of points to use when requesting the Intersection Service.
function BufferRequest(conf,inputs,outputs){

  var fGJ=new ZOO.Format.GeoJSON();
  var bbox=BufferToBBOX(inputs,0.0015);
  var myProcess2 = new ZOO.Process(zoo_url,'Intersection');
  var myInputs2 = {InputEntity1: { type: 'complex',  value: fGJ.write(bbox[1]), mimeType: "application/json"}, InputEntity2: { type: 'complex',  xlink: "http://localhost/cgi-bin/mapserv?map="+mapfile+"&SERVICE=WFS&version=1.0.0&request=GetFeature&typename=points&SRS=EPSG:4326&BBOX="+bbox[0].left+","+bbox[0].bottom+","+bbox[0].right+","+bbox[0].top, mimeType: "text/xml" } };
  var myOutputs2= {Result: { type: 'RawDataOutput', "mimeType": outputs["Result"]["mimeType"]  } };
  var myExecuteResult4=myProcess2.Execute(myInputs2,myOutputs2);
  outputs["Result"]["value"]=myExecuteResult4;
  return {result: ZOO.SERVICE_SUCCEEDED, outputs: outputs };

}
Warning
to take advantage of the ZOO-Kernel cache system, you directly use the WFS
request as xlink:href rather than value for InputEntity2 (from line 31 to 34) and use text/xml mimeType
(on line 40). Indeed, the ZOO-API doesn’t use the internal cache mechanisms.
Publish and use your Service
Now, you can publish your service as you did before. To use your service, please use the following url.
Note
You can click on “Buffer Request and Mask” to get the same result as presented in the initial screenshot.
Conclusion
After understanding how basic Geometric Operation Services works, here you built step by step new JavaScript services which reuse the previous ones and combine them in different ways. This was achieved using the ZOO-API, composed by C functions exposed by the ZOO-Kernel to the JavaScript services runtime environement and the JS files which can be optionally installed.
Footnotes